
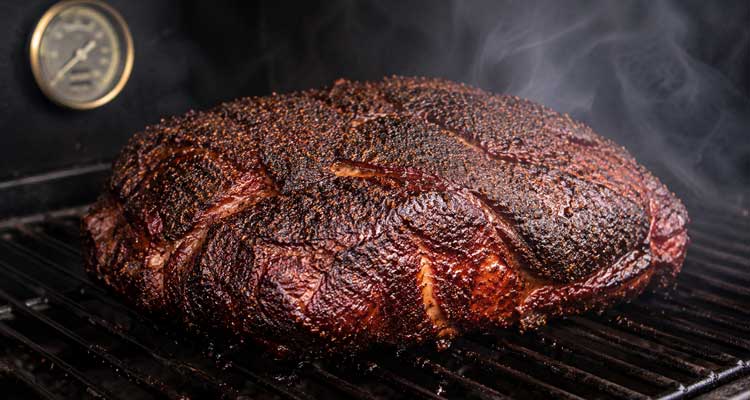
Smoking a pork shoulder transforms one of the most affordable cuts at the butcher counter into an unforgettable BBQ experience. A well-smoked Boston butt practically shreds itself into tender, juicy pulled pork — the kind that draws a crowd to the kitchen before you’ve even finished pulling it apart.
Whether you’re a complete beginner or refining your technique, this comprehensive guide walks you through every step from selecting the right cut to serving championship-level results. It focuses specifically on the Boston butt — the upper shoulder cut ideal for pulled pork.
You’ll learn how to manage the notorious “stall,” achieve beautiful bark formation, and master temperature control throughout a long cook. Best of all, this cut is remarkably forgiving, making it perfect for building your smoking skills while still delivering impressive results every time.
The fundamentals are straightforward: set your smoker to 225–275°F and cook to an internal temperature of 195–205°F.
Plan on roughly 1.5–2 hours per pound at 225°F for an 8–10 lb Boston butt. Everything below covers what you need to nail it.
- Smoker temp: 225–250°F (low & slow) or 275°F (faster cook)
- Internal temp target: 195–205°F (sweet spot: 203°F)
- Time estimate: 1.5–2 hrs/lb at 225°F | 1–1.5 hrs/lb at 275°F
- Wrap at: 160–165°F internal (foil or butcher paper)
- Rest time: Minimum 1 hour, ideally 2 hours
- Best wood: Hickory, apple, cherry, or pecan
Boston Butt vs Picnic Shoulder: What’s the Difference?
Before you fire up your smoker, let’s clear up some confusion about pork shoulder terminology. When most people say “pork shoulder,” they’re actually referring to a Boston butt — and despite its misleading name, this cut comes from the upper part of the shoulder, nowhere near the pig’s rear end.
The name dates back to colonial New England, where butchers packed these cuts into barrels called “butts” for storage and transport.
The pork shoulder actually consists of two distinct cuts. The Boston butt comes from the upper shoulder and features excellent marbling throughout the meat. The picnic shoulder (or “picnic roast”) comes from the lower shoulder extending down into the foreleg.
While both cuts can be smoked, the Boston butt reigns supreme for pulled pork thanks to its higher fat content and more consistent marbling that keeps the meat moist during long cooking times. When buying, plan on roughly 1 pound of raw, bone-in pork shoulder per 2 people — cooked yield after trimming fat and losing moisture during the long cook works out to about 40-50% of the raw weight. For a party of 8-10, an 8-9 lb shoulder is a safe target with leftovers.
| Feature | Boston Butt | Picnic Shoulder |
|---|---|---|
| Location | Upper shoulder | Lower shoulder/foreleg |
| Fat Content | Higher, well-marbled | Leaner |
| Marbling | Excellent throughout | Less consistent |
| Weight Range | 6–10 lbs typical | 4–12 lbs |
| Best Use | Pulled pork, smoking | Roasting, braising |
| Bone Configuration | Single shoulder blade | Arm bone + more |
Bone-In vs Boneless: Making the Right Choice
When selecting a Boston butt, compare how each option handles during a long smoke:
- Bone-in Boston butt: This is the stronger choice for smoking. The bone supports the meat so it holds its shape and remains easier to move when hot and tender. It also contributes to moisture retention and subtle flavor depth, although that flavor effect is more noticeable in shorter cooking methods.
- Boneless Boston butt: This cut works well in some recipes, but it tends to lose its shape when moved and often needs butcher’s twine to hold it together during cooking.
For a first smoke—and for most later cooks—choose a bone-in Boston butt weighing 8–10 pounds. That range offers predictable timing, manageable portions, and enough meat to feed a crowd.
- Spice Guru BBQ seasoning — good rub choice for tender pork shoulder
- Kona smoker pellets — produces clean smoke for flavorful pork
- Bryco Goods pink butcher paper — helps retain moisture during long pork shoulder cooks
- Heat-resistant BBQ gloves — handling and shredding hot meats safely
What Equipment Do You Need to Smoke Pork Shoulder?
Successful pork shoulder smoking doesn’t require a massive investment in equipment, but having the right tools makes the process significantly easier and more enjoyable.
If you’re new to smoking, our BBQ basics for beginners guide covers fundamental equipment selection in detail.
Smoker Type Considerations
Any smoker that can maintain steady temperatures between 225–275°F for extended periods will work for pork shoulder. Temp stability matters more than smoker style when it comes to consistent results. Here’s how the main types compare:
- Pellet smokers: The ultimate set-and-forget experience. They maintain consistent temperatures automatically and are ideal for overnight smoking sessions. The wood pellet flavor you choose matters — our best wood pellets for smoking guide covers the top picks for pork. See also our portable pellet grill picks for compact options.
- Ceramic smokers (Kamado-style): Excellent heat retention and fuel efficiency. They’ll hold steady temperatures for hours on a single load of charcoal. Use a water pan to add humidity and prevent drying.
- Electric smokers: Reliable temp control without the hassle of managing fuel. Just monitor the water pan to ensure it doesn’t run dry during the long smoke.
- Offset smokers: Produce the most authentic smoke flavor and give you complete control over the fire. The learning curve is steeper, but many pitmasters swear by the results.
Critical Tools You’ll Need
An instant-read meat thermometer is absolutely non-negotiable — temp, not time, determines when your pork shoulder is done.
A wireless meat thermometer with multiple probes lets you monitor both meat and smoker temp without opening the lid. This is invaluable during long smoking sessions.
Keep these nearby:
- Heat-resistant gloves for handling hot meat
- A spray bottle for keeping the surface moist
- Heavy-duty aluminum foil or pink butcher paper for wrapping
- A large bowl for pulling the finished pork
- A sharp boning knife for trimming excess fat
Wood Selection Guide
| Wood Type | Flavor Intensity | Flavor Notes | Best For |
|---|---|---|---|
| Hickory | Strong | Bold, bacon-like, traditional | Classic BBQ flavor |
| Apple | Mild | Sweet, fruity, subtle | Delicate smoke ring |
| Cherry | Medium | Fruity, slightly sweet | Beautiful color |
| Pecan | Medium-Strong | Rich, nutty, complex | Texas-style BBQ |
| Oak | Medium | Clean, versatile | Blending with others |
| Mesquite | Very Strong | Earthy, intense | Use sparingly |
Wood selection significantly impacts your final flavor profile. Hickory delivers that bold, traditional BBQ taste that most people associate with smoked pork. Apple and cherry provide milder, sweeter smoke that won’t overpower the meat.
Pecan offers a rich, nutty complexity that works beautifully with pork.
Many experienced smokers use wood blends, combining a fruit wood with hickory or oak for balanced flavor.
For more guidance on wood selection, check out our comprehensive ultimate smoking guide.
How Do You Trim, Bind, and Season Pork Shoulder?

Trimming the Fat Cap
Your Boston butt likely arrived from the butcher with a thick fat cap covering one side. While fat contributes flavor and moisture, too much prevents smoke penetration and proper bark formation.
That flavorful, crusty exterior forms on meat surface, not on fat. Any thick fat layers will simply render away during the long smoke without creating the texture you want.
Trim the fat cap down to about 1/4 inch thickness, or even as thin as 1/8 inch. It’s easiest to trim when the meat is cold straight from the refrigerator, as the fat stays firmer and cuts more cleanly.
Use a sharp boning knife and trim away from your body for safety. Don’t go completely fat-free — that remaining thin layer helps keep the meat moist and contributes to flavor.
Applying the Binder
A thin binder gives the dry rub a tacky surface to cling to. The common choices perform the same basic job:
- Yellow mustard: This is the most popular option. It holds the rub in place, and its flavor cooks off completely during the long smoke.
- Olive oil: Use it when you want a simple binder you already have in the kitchen.
- Mayonnaise: This also creates the light, sticky coating needed to hold seasoning.
The binder choice does not materially change the final flavor. Apply only a thin layer over every surface—enough to make the meat tacky, not enough to create a thick coating.
Seasoning Strategy
A quality dry rub should include a balance of sweet, savory, and spicy elements. Most rubs start with:
- A paprika base for color
- Brown sugar for sweetness and bark formation
- Coarse salt and black pepper for savory depth
- Garlic powder, onion powder, and other spices for complexity
For proven championship-quality rubs, explore our guide to the best BBQ rubs and seasoning sets.
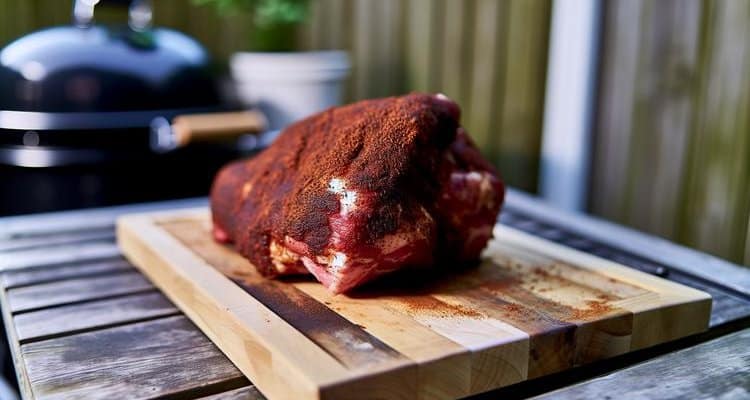
Apply your rub generously, but don’t go so heavy that you create a paste. Start with the less attractive bottom side, then flip and season the fat cap side and all sides.
Some pitmasters let the seasoned meat rest in the refrigerator overnight to let the rub penetrate, but you can also season immediately before smoking with excellent results. The long cooking time gives plenty of opportunity for flavor penetration either way.
During smoking, the surface seasonings combine with rendered fat and smoke to create complex chemical reactions (the Maillard reaction and caramelization) that develop deep flavor and color on the bark.
What Temperature and Timing Should You Use to Smoke Pork Shoulder?
Understanding the different temp phases during smoking helps you predict timing and know when to take action. Your pork shoulder goes through several distinct stages on its journey from raw to pull-apart tender.
| Phase | Smoker Temp | Internal Temp Range | Description |
|---|---|---|---|
| Smoker Temperature | 225–250°F | — | Ultra-tender, traditional |
| Smoker Temperature (Fast) | 275°F | — | Faster cook, still excellent |
| Initial Rise | Smoker temp | 32–145°F | Rapid temperature increase |
| The Stall | Smoker temp | 150–170°F | Plateau, evaporative cooling |
| Wrapping Decision | Smoker temp | 160–180°F | Stop moisture loss |
| Final Push | Smoker temp | 180–205°F | Collagen breakdown |
| Target Doneness | — | 195–205°F | Probe-tender, perfect pull |
| Resting | Off heat | Hold temp | Juice redistribution |
Initial Smoking Phase (4–6 hours)
Use the first 4–6 hours to build clean smoke flavor and begin forming the bark:
- Position the fat cap up. Set the prepared pork shoulder on the smoker so rendering fat can baste the meat as it melts.
- Choose the cooking temperature. Hold the smoker at 225–250°F for the traditional low-and-slow approach, or use 275°F when you need a shorter cook.
- Maintain clean smoke. Add wood chunks or chips and look for thin blue smoke rather than thick white billows. The cool, moist surface absorbs the most smoke flavor during this early phase.
- Spritz lightly. About once an hour, apply a few sprays of apple cider vinegar and water. This helps prevent the exterior from drying out and supports bark development without soaking the surface.
Steady heat, clean smoke, and restrained spritzing matter more here than constant lid checks.
Cooking Time Estimates by Weight
Use the table below for planning purposes, but remember: always cook to temp, not time. Every piece of meat is different, and environmental factors affect cooking speed.
| Weight | @ 225°F | @ 275°F | Total Time (with 2hr rest) |
|---|---|---|---|
| 6–7 lbs | 12–14 hours | 7–9 hours | 14–16 hrs / 9–11 hrs |
| 8–9 lbs | 16–18 hours | 9–11 hours | 18–20 hrs / 11–13 hrs |
| 10–11 lbs | 20–22 hours | 11–13 hours | 22–24 hrs / 13–15 hrs |
| 12–14 lbs | 24–28 hours | 13–16 hours | 26–30 hrs / 15–18 hrs |
Overnight Smoking Technique
Many home cooks find it convenient to start in the evening and let it smoke overnight. This works especially well with pellet or electric smokers that maintain consistent temperatures automatically.
Set your smoker to 225°F, ensure you have adequate fuel for the duration, and plan to wrap in the morning when internal temp reaches around 165°F.
Before bed, run through this checklist:
- Fuel hopper is full (for pellet smokers) or sufficient charcoal loaded (for other types)
- Water pan is full
- Internal meat temp and smoker temp verified
In the morning, check both temperatures again and proceed with wrapping if internal temp is between 160–180°F.
Some pitmasters prefer to build smoke flavor for the first 4–6 hours in the smoker, then finish the remaining cooking in a 225°F oven. This hybrid method still produces excellent results since most smoke absorption happens early in the cook.
What Is the Stall, and How Do You Manage It?
Around the 4–6 hour mark, something frustrating happens. The internal temp, which had been climbing steadily, suddenly stops rising. It might sit at 160°F for two hours, three hours, or even longer.
Your smoker temp is perfect, your fire is burning clean, yet the internal meat temp refuses to budge. Welcome to “the stall” — the most misunderstood and anxiety-inducing phase of smoking pork shoulder.
The Science Behind The Stall
The stall occurs due to evaporative cooling. As your pork shoulder heats up, moisture inside the meat begins moving toward the surface.
When this moisture reaches the surface, it evaporates into the smoker’s dry heat. This phase change from liquid water to water vapor requires energy, which gets pulled from the meat itself, cooling it down.
It’s the same reason you feel cold when you step out of a shower — the evaporating water on your skin pulls heat away from your body.
Inside your smoker, the meat is essentially “sweating,” and this sweating cools it down at the same rate the smoker’s heat is trying to warm it up. The result is a temp plateau that can last for hours.
Here’s the good news: the stall is actually a sign that everything is working correctly. During this phase, the tough collagen in the meat is beginning to break down into gelatin — the transformation that eventually makes your pork shoulder tender enough to pull apart.
The stall doesn’t stop this collagen breakdown; it’s simply slowing the temp rise while important textural changes continue happening.
Two Approaches to The Stall
You can manage the stall by leaving the pork shoulder exposed or wrapping it to reduce evaporative cooling. Choose based on the result and timing you value most:
- Wait it out unwrapped: Continued surface drying creates the strongest, crunchiest bark, but it can add 2–4 hours to the total cook. Use this approach when you have plenty of time and bark quality is the priority.
- Power through by wrapping: Aluminum foil or butcher paper creates a humid environment that limits evaporation, helps the internal temperature rise again, and lets the meat braise in its own juices. The pork stays exceptionally moist, but the bark becomes softer. Choose this approach when timing or maximum tenderness matters more; unwrap for the final 30 minutes if you want to firm the exterior.
Whichever approach you choose, resist opening the smoker repeatedly. Each lid opening drops the temperature and adds moisture to the chamber, extending the stall instead of helping it pass.
Should You Wrap Pork Shoulder in Foil or Butcher Paper?
| Factor | Aluminum Foil | Butcher Paper | Unwrapped |
|---|---|---|---|
| Cook Speed | Fastest | Moderate | Slowest |
| Bark Quality | Softer | Good retention | Best / crunchiest |
| Moisture Retention | Maximum | Very good | Lowest |
| Breathability | None (sealed) | Partial | Full |
| Best For | Time-crunched cooks | Competition BBQ | Maximum bark lovers |
When to Wrap
The most common wrapping trigger point is 160–165°F internal temp, which typically occurs right as the stall begins. However, some pitmasters wait until 180°F to wrap, accepting the longer stall in exchange for better bark development during those unwrapped hours.
The visual cue you’re looking for is good bark formation — a dark, firm, almost crusty exterior that has set nicely.
Aluminum Foil Method (Texas Crutch)
The aluminum foil method, affectionately known as the “Texas Crutch,” is the most effective way to power through the stall. Heavy-duty aluminum foil creates a completely sealed environment that traps all moisture.
The meat essentially braises in the liquid it releases, along with any liquids you add before sealing.
To wrap with foil:
- Lay out two sheets of heavy-duty aluminum foil (about 3 feet each) in a plus sign (+) pattern
- Optionally add a splash of apple juice, a pat of butter, or a sprinkle of additional rub
- Place the meat in the center
- Bring up the sides and fold them together, creating a tight seal with no air pockets
- Return the wrapped package to the smoker
The aluminum foil method produces the fastest cook times and the most tender, falling-apart texture. The downside is a softer bark. If the exterior feels too soft when you unwrap, you can return the unwrapped meat to the smoker for the final 30 minutes to firm it up.

Butcher Paper Method
Pink butcher paper (not to be confused with regular brown kraft paper or parchment paper) offers a middle ground between foil and leaving the meat unwrapped. The paper is breathable, allowing some moisture to escape while still reducing evaporative cooling.
This slower moisture release results in better bark retention compared to foil. To wrap with butcher paper, use 2–3 layers for strength, and wrap tightly — though not as airtight as foil. Some moisture will soak into the paper, which is normal and actually contributes to the braising effect.
Butcher paper extends cook time slightly compared to foil, but preserves more of that desirable bark texture. It’s become the preferred method among many competition BBQ teams who need both a great exterior and maximum tenderness.
Post-Wrap Smoking
After wrapping, return the package to the smoker. Some pitmasters lower the temp to 225°F at this point to avoid overcooking, though maintaining your original temp works fine too.
Continue smoking until internal temp reaches 195–205°F, which typically takes another 2–4 hours.
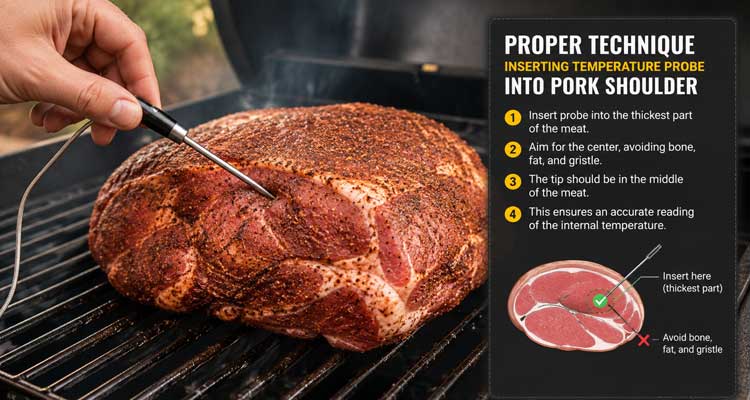
Check the internal temp every 45–60 minutes. Insert the probe into the thickest part of the meat, avoiding the bone, which can give false readings.
How Do You Check Doneness and Rest Pork Shoulder?
Temperature Testing
Internal temp is your primary doneness indicator, but 203°F isn’t a magic number that guarantees perfection. Different pieces reach ideal tenderness at slightly different internal temperatures.
The meat is done when it’s probe-tender — meaning your instant-read thermometer slides in and out like you’re poking room-temp butter.
Test multiple spots in the thickest parts. Avoid the bone area, which can feel soft even when the surrounding meat isn’t fully tender.
If the probe meets significant resistance, it needs more time even if internal temp is high enough. If it glides through effortlessly, you’ve achieved that perfect fall-apart texture.
The Importance of Resting
Resting is not optional — it’s a critical step that separates good pulled pork from great pulled pork. During the long smoke, the juices have been pushed toward the exterior by heat.
Resting allows those juices to redistribute throughout. The muscle fibers also relax during resting, making it easier to pull apart and more tender to eat.
Rest the wrapped meat for a minimum of 1 hour, though 2 hours is ideal. Properly wrapped meat holds heat remarkably well — it will stay above 140°F (the food safety minimum) for 2–3 hours when wrapped.
Many pitmasters use this extended holding time to their advantage when timing meal service. For more on resting techniques and the science behind it, see our article on why resting meat is crucial.
Cooler Resting Technique
The “faux Cambro” method (named after the insulated cabinets restaurants use for holding hot food) is perfect for resting:
- Keep the meat in its foil or paper wrap
- Wrap the entire package in an old beach towel or two
- Place it in an empty cooler and close the lid
In this insulated environment, it will stay hot and food-safe for 3–4 hours, sometimes longer. This technique is invaluable when you need to time it to be ready when guests arrive.
You can pull from the smoker hours early and hold it perfectly until serving time, all while the resting process continues to improve texture and moisture distribution.
How Do You Pull and Serve Pork Shoulder?
The Pulling Process
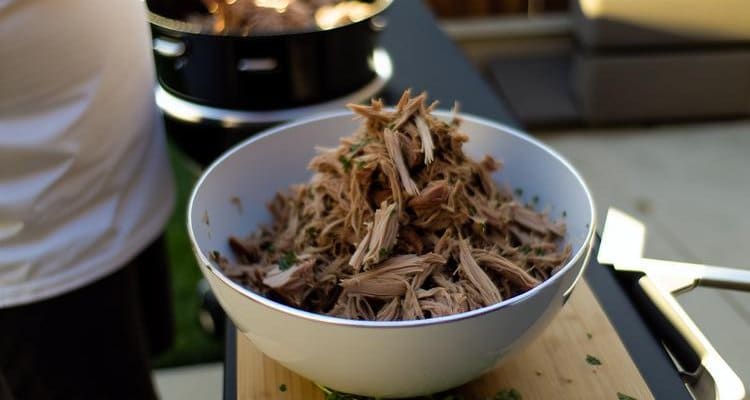
After the pork shoulder has rested, work through it methodically so the bark, juices, and tender meat are distributed evenly:
- Save the juices. Unwrap the pork over a large aluminum pan so none of the collected liquid is lost.
- Remove the bone. It should slide out cleanly with minimal effort. If it does not, give the meat more time before pulling.
- Protect your hands. Wear heat-resistant rubber gloves with food-safe latex or nitrile gloves layered over them for cleanliness.
- Pull with the grain. Separate the pork by hand along its natural muscle grain instead of chopping it, which preserves a better texture.
- Clean and combine. Discard large pieces of unrendered fat, gristle, or cartilage. Break the dark bark into smaller chunks and mix it throughout the lighter meat so every serving receives some concentrated smoke flavor.
The finished pile should combine tender strands, small bark pieces, and the captured juices rather than separating the flavorful exterior from the rest of the meat.
Moisture Addition Technique
Even perfectly smoked meat benefits from a moisture boost before serving. A popular technique is to create a simple finishing sauce to toss with the pulled pork:
- 1/2 cup apple cider vinegar
- 1/2 cup light brown sugar
- 1 tablespoon of your original rub
- Any reserved pan juices
Whisk until the sugar dissolves, then add your pulled pork to a large bowl and pour the mixture over it. Toss gently but thoroughly to coat.
This adds moisture, balances the rich fattiness with bright acidity, and helps meld all the flavors together. The pork should look glossy and moist but not swimming in liquid.
Serving Suggestions
Serve your smoked pulled pork on soft hamburger buns. We recommend offering your favorite BBQ sauce on the side rather than mixing it in beforehand — this allows everyone to appreciate the authentic smoke flavor and add sauce to their own taste.
Top with tangy coleslaw for textural contrast and acidity that cuts through the richness. Add pickles and sliced onions for additional brightness.
Leftover pulled pork is incredibly versatile:
- Tacos with fresh cilantro and lime
- Nachos with cheese and jalapeños
- Pizza with BBQ sauce and red onions
- Reheated on sandwiches throughout the week
How Do You Store, Freeze, and Reheat Pulled Pork?
A full pork shoulder produces a generous amount of pulled pork — often 4–6 pounds of finished meat from an 8–10 lb butt after cooking loss.
Knowing how to properly store and reheat leftovers keeps that smoked pulled pork just as good on day three as day one.
Refrigerator Storage
Store pulled pork in an airtight container in the refrigerator for up to 4 days. Keep any reserved pan juices or finishing sauce in a separate small container and add when reheating to restore moisture.
Let the meat cool to room temp (no more than 2 hours out) before refrigerating.
Freezer Storage
Smoked pulled pork freezes exceptionally well for up to 3 months. For best results:
- Portion into meal-sized freezer bags (1–2 cups per bag works well for sandwiches)
- Press out as much air as possible and lay flat to freeze
- Add a splash of apple juice or pan drippings before sealing to lock in moisture
- Label bags with the date
For longer storage, vacuum sealing extends freezer life to 6 months with minimal quality loss. If you don’t have a vacuum sealer, double-bag in zip-lock freezer bags for protection against freezer burn.
Reheating Methods
- Oven (Best Method): Place pulled pork in an oven-safe dish, add a splash of apple juice, apple cider vinegar, or reserved pan juices, cover tightly with foil, and heat at 250°F for 20–30 minutes until warmed through. The low temp and covered dish prevents drying out.
- Stovetop: Add pulled pork to a skillet over medium-low heat with a few tablespoons of liquid (apple juice, broth, or water). Stir occasionally and heat for 5–8 minutes until hot. Watch carefully — high heat will dry it out quickly.
- Microwave (Quick Option): Place in a microwave-safe dish, add a splash of liquid, cover with a damp paper towel, and microwave in 60-second increments on 50% power, stirring between each. The lower power setting and moisture are key to preventing dried-out edges.
- From Frozen: Thaw overnight in the refrigerator before reheating using any method above. For a quicker option, reheat from frozen in the oven at 275°F for 45–60 minutes (covered with foil) or place the sealed bag in a pot of simmering water for 20–30 minutes.
How Do You Fix Common Pork Shoulder Problems?
| Problem | Likely Cause | Solution |
|---|---|---|
| Tough, chewy texture | Didn’t reach high enough internal temperature | Cook to 203°F internal temp minimum, probe-tender test |
| Dry meat | Overcooked past 210°F OR didn’t rest | Monitor internal temp closely, always rest 1–2 hours |
| No bark formation | Too much moisture, wrapped too early | Wait until 165°F internal temp to wrap, reduce spritzing |
| Stall lasting 6+ hours | Temperature too low, lid opened often | Maintain 225°F+, stop opening smoker |
| Mushy, falling-apart texture | Cooked past 210°F | Pull at 203–205°F for texture |
| Smoke flavor too mild | Not enough wood, wrapped too early | Add more wood first 4 hours, wrap at 165°F+ |
| Too smoky/bitter | Too much smoke or wrong wood | Use milder woods, thin blue smoke only |
| Uneven cooking | Hot spots in smoker | Rotate meat halfway, use water pan |
Prevention Tips
- Always use a thermometer — Time is just an estimate; temp tells the truth about doneness
- Don’t rush the stall — It’s a normal part of the process that indicates collagen is breaking down
- Resist opening the smoker — “If you’re lookin’, you ain’t cookin'” as the saying goes
- Plan extra time — It’s better to have your pork shoulder finish early and rest in a cooler than to keep hungry guests waiting
- Practice patience — Low and slow wins the race every time in BBQ
Frequently Asked Questions
What’s the difference between Boston butt and picnic shoulder?
Boston butt comes from the upper part of the shoulder and has more marbling, making it ideal for pulled pork. The picnic shoulder is from the lower shoulder/foreleg area, is leaner, and has more bone complexity.
For smoking, Boston butt is the preferred choice due to its higher fat content and more consistent marbling that produces more tender, juicy smoked pulled pork.
Do I need to trim the fat cap on pork shoulder?
Yes, trim the fat cap down to about 1/4 to 1/8 inch. This allows the seasoned bark to form on the meat rather than on a thick layer of fat.
Too much fat won’t render during cooking and can prevent smoke penetration. The remaining thin layer still provides moisture and flavor without interfering with bark development.
What’s the best temperature to smoke pork shoulder?
225–250°F is the traditional “low and slow” range that produces ultra-tender meat with the best smoke flavor absorption.
If you’re short on time, 275°F works well and can cut cooking time by 30–40% while still producing excellent results. Both temperature ranges will successfully break down the collagen for tender smoked pulled pork.
How long does it take to smoke a pork shoulder?
Plan for 1.5–2 hours per pound at 225°F, or 1–1.5 hours per pound at 275°F. An 8–10 lb Boston butt typically takes 10–16 hours depending on temperature.
However, always cook to internal temperature (203°F), not time. Environmental factors, meat composition, and your specific smoker all affect actual cooking duration.
What is the stall and how do I handle it?
The stall occurs when the internal temperature plateaus around 150–170°F for several hours. It’s caused by evaporative cooling as moisture leaves the meat.
You can either wait it out for better bark development (adds 2–4 hours), or wrap in foil or butcher paper to push through faster while retaining moisture. Both approaches produce excellent results.
Should I wrap my pork shoulder?
Wrapping is optional but recommended for most cooks. Wrap around 165°F internal temperature to speed up cooking and retain moisture.
Use aluminum foil for fastest cooking and maximum moisture retention, or butcher paper for better bark preservation. Wrapping helps you power through the stall and keeps the meat incredibly tender.
What internal temperature should pork shoulder reach?
Target 195–205°F, with the sweet spot around 203°F internal temperature. At this range, the collagen has fully broken down into gelatin, making it tender enough to pull apart easily.
More important than the exact number is the probe test — your thermometer should slide in and out like room-temperature butter.
How do I know when pork shoulder is done?
Internal temperature is your primary indicator (203°F), but also perform the “probe test” — your thermometer should slide in with no resistance, like poking softened butter. The bone should pull out easily.
If it feels mushy, it’s overcooked; if it feels tough or the probe meets resistance, it needs more time regardless of internal temperature.
Can I smoke a pork shoulder overnight?
Yes, especially with pellet or electric smokers that maintain consistent temperature automatically. Start in the evening at 225°F, ensure adequate fuel for 8–10 hours, and plan to wrap in the morning around 165°F internal temperature.
Check temperature at bedtime and when you wake. This method works great for having smoked pulled pork ready by afternoon.
What’s the best wood for smoking pork shoulder?
Apple and cherry are excellent choices for mild, sweet smoke that won’t overpower the pork. Hickory provides traditional bold BBQ flavor. Pecan offers a nice middle ground with nutty complexity.
Many pitmasters use blends, combining fruit woods with hickory or oak. Avoid mesquite unless you want very strong smoke flavor.
Why is my pork shoulder tough or dry?
Tough meat means it was pulled too early, before the tough connective tissue (collagen) had time to break down into tender gelatin. This critical transformation happens between 195–205°F internal temperature.
Dry meat is typically caused by overcooking past 210°F internal temp or by not resting it long enough, which causes the juices to run out when pulled instead of staying distributed throughout.
How long should pork shoulder rest?
Minimum 1 hour, ideally 2 hours. The meat will stay hot for 2–3 hours when properly wrapped.
For maximum convenience, wrap in a towel and place in an empty cooler where it can hold safely for 3–4 hours. This long rest allows juices to redistribute throughout the meat and muscle fibers to relax, resulting in more tender, juicier smoked pulled pork.
How do you reheat smoked pulled pork without drying it out?
The best method is the oven: place pulled pork in a covered dish with a splash of apple juice or reserved pan drippings at 250°F for 20–30 minutes, keeping it covered with foil throughout.
For stovetop, reheat in a skillet over medium-low with liquid added, stirring occasionally. Avoid high heat with any method — it evaporates moisture quickly. If frozen, thaw overnight in the fridge first for best results.
Conclusion
Smoking pork shoulder — the foundation of great smoked pulled pork — transforms simple ingredients into an unforgettable BBQ experience through patience, temp management, and understanding the science behind low and slow cooking. Here are the key takeaways:
- Choose a well-marbled, bone-in Boston butt (8–10 lbs)
- Maintain steady smoker temperatures between 225–275°F
- Manage the stall with either patience or wrapping
- Cook to 203°F probe-tender doneness — not by time
- Always rest for at least 1–2 hours before pulling
Your next steps are straightforward: select your Boston butt, plan your timing with plenty of buffer hours for the stall and resting, and gather your equipment including a reliable wireless meat thermometer.
Remember that every pitmaster’s first smoke was a learning experience, and even imperfect results are usually delicious. This cut is one of the most forgiving in BBQ — the high fat content and connective tissue mean that even if your temp control isn’t perfect, you’ll likely still end up with tasty pulled pork.
Each smoke teaches you something new about your equipment, your preferences, and the subtle art of managing fire and smoke. Embrace the journey — the anticipation, the aroma, and the satisfaction of creating something truly special from simple ingredients and time are all part of what makes BBQ such a beloved tradition.
Related BBQ Guides

Charcoal Grill Smoker Combos: Your In-Stock Buying Guide
Find top charcoal grill smoker combos in stock now. Compare offset models with dual-zone cooking, side fireboxes & authentic smoke flavor.
Master the Art of Marinating Chicken for Juicy Results
Learn how to marinate chicken the right way — the right acids, oils, timing per cut, grilling tips, and common mistakes to avoid for juicy, flavorful results.

Smoked Corned Beef Rub for a Perfect Pastrami-Style Bark
Master our smoked corned beef rub recipe to create a perfect pastrami-style bark. Learn the essential steps for soaking, smoking, and slicing corned beef.