

Competition-quality spare ribs start on the cutting board, not in the smoker. Trimming a full spare rib rack into a clean St. Louis style cut takes about 10 minutes and dramatically improves how evenly your pork ribs cook. The USDA recommends cooking all fresh pork to a minimum internal temperature of 145°F with a 3-minute rest.[USDA] For spare ribs smoked low and slow, pitmasters target 195-203°F internal for tender, pull-apart meat. This guide covers exactly how to trim spare ribs step by step, what to do with the trimmings, and how to slice ribs cleanly after cooking.
- Why Trim? Trimming spare ribs into a St. Louis style cut ensures even cooking, removes tough cartilage and unrenderable fat, and improves smoke penetration. This results in a consistently tender, flavorful rack without dry ends or chewy bits.
- Key Steps: The process involves removing the silver skin membrane, slicing off the skirt meat, cutting away the breast bone cartilage, and squaring up the rack. These steps create a uniform, rectangular slab ideal for smoking.
- Tools & Time: You’ll need a large cutting board, a sharp 5-7 inch boning knife, and paper towels for grip. The entire trimming process typically takes a beginner 8-12 minutes per rack, becoming faster with practice.
- Trimmings Use: Don’t discard trimmings. The breast bone section can be chopped into BBQ rib tips, while skirt meat can be smoked as a pitmaster snack or ground for sausage. Excess fat can be rendered into lard.
Should You Trim Spare Ribs or Not?
You should always trim spare ribs before smoking or grilling. Trimming creates a uniform rectangular shape that cooks evenly, removes chewy cartilage and hard fat that won’t render, and allows smoke and dry rub to penetrate the meat more effectively. Untrimmed racks produce inconsistent results with burnt thin ends and tough bites.
Trimming improves the rack in three practical ways:
- More even cooking: Trimming meat for even cooking solves the biggest problem with this cut: uneven thickness. A full untrimmed rib rack has thin, tapered ends that dry out and burn long before the thick center finishes cooking.
- Better texture: The breast bone section contains hard cartilage that never softens, even after hours of smoking. Removing it gives diners nothing but tender, meaty bites from end to end.
- Cleaner presentation: A squared-up St. Louis style rack looks clean on the plate and fits neatly on standard smoker grates without hanging over edges.
The result is a uniform rack that cooks more predictably and serves more cleanly.
What Is the Anatomy of a Pork Rib Rack?
A full spare rib rack has four distinct parts: the main rib bones running across the center, the breast bone and cartilage strip along the top edge, the skirt or flap meat on the bone side, and the thin membrane covering the back. Understanding each part tells you exactly where to trim spare ribs for a clean St. Louis cut.

| Rib Section | Where It Is | Trim Decision | Best Use |
|---|---|---|---|
| Main rib bones | Center of the rack | Keep as the St. Louis slab | Low-and-slow smoking |
| Breast bone cartilage | Top edge of the rack | Remove in a straight cut | Rib tips |
| Skirt meat | Loose flap on bone side | Remove before cooking | Pitmaster snack or sausage |
| Membrane | Bone side | Peel off first | Discard |
Use this anatomy map to separate the keep, trim, and discard portions before making the first cut.
The Main Rib Bones
The main rib bones form the core of the rack. These curved bones hold the majority of the meat and define the final shape of your trimmed slab.
The Breast Bone and Cartilage
The breast bone sits along the top edge. This section contains a mix of cartilage, small bones, and pockets of fat that cook unevenly.
The Skirt Meat (Flap)
The skirt meat is a loose flap attached to the bone side. It cooks faster than the rest of the rack, so removing it prevents burning.
The Silver Skin Membrane
The silver skin membrane covers the concave bone side. This papery layer blocks smoke and rub from reaching the meat and must be removed first.
How to Avoid ‘Shiners’ When Buying Spare Ribs
When selecting a rack of pork spare ribs at the grocery store or butcher shop, inspect the meat side closely to avoid ‘shiners.’ A shiner is a rack where the butcher cut too close to the bone, leaving the shiny white rib bone exposed through the meat. During the long smoking process, these exposed bones heat up rapidly, causing the surrounding meat to dry out, shrink, and potentially fall off. Look for racks with a thick, even layer of meat covering all the bones to ensure uniform cooking and juicy results.
- Extra-long stainless steel rib rack — cooks meat upright to fit more in smoker
- Bryco Goods pink butcher paper — keeps brisket, ribs, and pork moist during the stall
- ThermoMaven instant-read meat thermometer — quick doneness check at the grill
What Tools Do You Need to Trim Ribs?
To trim spare ribs, you need a large, stable cutting board for a safe workspace, a sharp 5-to-7-inch boning knife for precise cuts, and paper towels to get a firm grip on the slippery membrane for easy removal. These basic items ensure a clean and efficient process.
You only need a few basic tools to get a clean, professional trim on your spare ribs. Having the right equipment makes the job faster, safer, and more precise.
- Large Cutting Board: A large, stable cutting board gives you plenty of room to work and contains any mess. A plastic board is easy to sanitize.
- Sharp Boning Knife: A 5-to-7-inch flexible boning knife is ideal for navigating around bones and cartilage.
- Paper Towels: A dry paper towel is essential for gripping the slippery membrane to peel it off cleanly.
How Should You Safely Handle Raw Pork?
For safe pork handling, wash hands thoroughly before and after contact and use a separate cutting board to prevent cross-contamination. Keep raw pork refrigerated at or below 40°F until ready to cook. Sanitize all tools, boards, and work surfaces with hot, soapy water when finished.
Proper food safety is crucial when working with raw meat. Always wash your hands with soap and warm water for at least 20 seconds before and after touching pork. Use a dedicated, non-porous cutting board for raw meat to avoid contaminating other foods. The USDA advises keeping raw pork refrigerated at 40°F or below to inhibit bacterial growth.[USDA]
Prepping Enhanced or Pre-Packaged Ribs
Many pre-packaged spare ribs found in supermarkets are ‘enhanced,’ meaning they have been injected with a sodium, water, and phosphate solution to preserve moisture. While this keeps the meat juicy, it also makes the ribs naturally salty. If your package label indicates the ribs are enhanced or contain up to a certain percentage of a solution, you must adjust your prep. Skip any overnight dry brining, and choose or make a dry rub with reduced salt content to prevent the finished ribs from tasting overly cured or salty.
How to Trim Spare Ribs into St. Louis Style (Step-by-Step)
Trimming spare ribs into St. Louis style involves four steps: peel off the back membrane, slice away the skirt meat, cut off the breast bone cartilage in a straight line, and square up the tapered end. You need a sharp boning knife, paper towels for grip, and a large cutting board.
The entire process takes 8-12 minutes per rack.
Step 1: Remove the Membrane (Silver Skin)
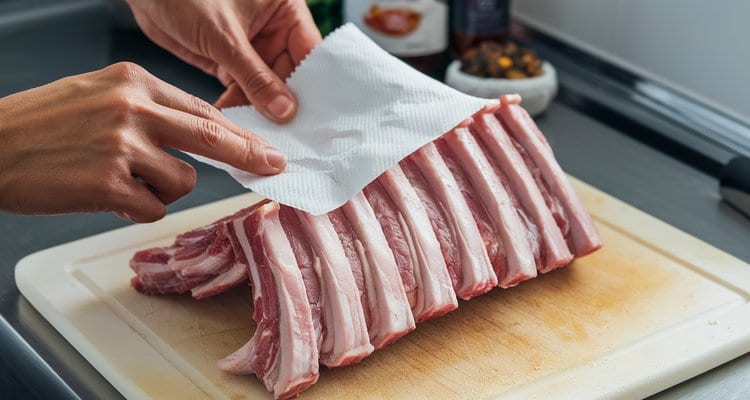
Remove the membrane with this sequence:
- Position the rack: Flip it bone-side up.
- Lift an edge: Slide a butter knife or the tip of a boning knife under the membrane near the middle of the rack to raise a small flap.
- Get a firm grip: Grab the lifted edge with a dry paper towel.
- Peel toward the end: Pull the membrane off in one smooth motion. It should come away in a single sheet.
- Restart if needed: If the silver skin tears, lift a new edge and pull again. Thicker membranes may come off in two or three pieces.
Once the membrane is off, the bone side is ready to accept smoke and seasoning.
Removing the membrane is standard practice for competition-style ribs because it maximizes rub penetration and helps produce a tender bite. Some backyard pitmasters prefer to leave it on because it can hold a very tender rack together and create a slightly crispy texture on the bone side. If you leave it intact, score a crosshatch pattern with a sharp knife so some smoke and seasoning can still reach the meat. Also check pre-trimmed, store-bought St. Louis style racks, because the butcher may already have removed the membrane.
Step 2: Remove the Skirt Meat
With the rack still bone-side up, locate the loose flap of skirt meat running diagonally across the bones. Grip one end and slice it away with your boning knife. Set the skirt meat aside. It makes an excellent pitmaster snack when seasoned and smoked alongside the main rack.
Step 3: Remove the Breast Bone
Use the natural joint as your guide for a clean cut:
- Turn the rack over: Place it meat-side up.
- Find the transition: Press along the top edge to locate the line where the curved rib bones end and the breast bone cartilage begins.
- Follow the joint: With your boning knife, cut a straight line across the full width of the rack.
- Remove the section: Lift away the entire breast bone section in one piece.
This straight cut separates the rectangular St. Louis slab from the cartilage-heavy breast bone section.
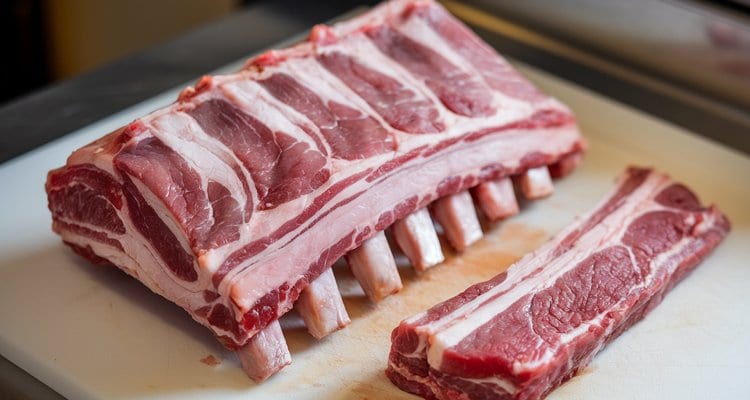
If you struggle to locate the exact transition, use the ‘fold’ or ‘hinge’ test. Hold the rack with both hands and gently bend it as if you were closing a book. The rigid section containing the real rib bones will remain straight, while the soft cartilage area will naturally bend or hinge. Mark this crease line with your knife; it is the exact path for a clean, effortless cut.
Step 4: Square Up the Rack and Trim Excess Fat
Cut off the small, thin bone at the tapered end of the rack. This narrow piece burns easily and has very little meat. Trim any thick, hard fat caps from the meat side. Leave a thin layer of fat for flavor and moisture, but remove any solid white chunks that won’t render during cooking. Your finished rack should be a clean rectangle with even thickness. This is the classic St. Louis style cut preferred for competition and backyard smoking.
| Step | Action | Tool | Time |
|---|---|---|---|
| 1 | Remove membrane (silver skin) | Butter knife + paper towel | 2-3 min |
| 2 | Remove skirt meat | Boning knife | 1-2 min |
| 3 | Remove breast bone cartilage | Boning knife | 2-3 min |
| 4 | Square up rack and trim excess fat | Boning knife | 3-4 min |
Use the sequence as a trimming checklist, working carefully through each cut before moving to the next.
Trimming Oversized or Heavy Spare Rib Racks
If you are working with an exceptionally large or heavy rack of spare ribs (such as a 6- to 7-pound slab), you will need to adjust your trimming approach. These heavy racks often feature a much thicker fat cap on the meat side and denser, semi-hardened cartilage along the breast bone. Use a heavy-duty chef’s knife or a cleaver to press firmly through the thick cartilage joints rather than a flexible boning knife. Additionally, spend extra time shaving down the thick fat deposits to a uniform one-quarter inch, ensuring the heat can penetrate and render the fat properly during a longer smoke time.
What to Do With Spare Rib Trimmings
Never throw away spare rib trimmings. The breast bone section makes classic BBQ rib tips when chopped into 2-inch chunks and smoked at 250°F for 2-3 hours. The skirt meat works as a seasoned pitmaster snack or can be ground for homemade pork sausage.
Fat trimmings render into cooking lard or add moisture to lean ground pork for burgers.
Make Classic BBQ Rib Tips
Chop the breast bone section into 2-inch pieces. Season with your favorite rub and smoke at 250°F for 2-3 hours until tender. These are a BBQ staple in Chicago and Memphis.
How to Prep and Serve Chicago-Style Rib Tips
To serve your rib tips authentic Chicago-style, start by smoking the entire breast bone section alongside your main rack. Once the cartilage has softened and the meat is tender (usually after 2 to 3 hours of smoking), transfer it to a cutting board. Use a heavy cleaver to chop the section into bite-sized, 1-to-2-inch pieces, cutting straight through the soft cartilage. Toss the chopped tips generously in a sweet, tomato-based BBQ sauce and serve them piled high over a bed of French fries or sliced white bread to soak up the juices.
Grind for Sausage or Burgers
Grind the skirt meat and excess fat together for homemade pork sausage patties or blended pork burgers.
Create a Pitmaster Snack
Season the skirt meat with salt, pepper, and garlic powder. Toss it on the smoker alongside the main rack for a quick snack in about 45 minutes.
Render Your Own Lard
Chop hard fat trimmings into small cubes and render them slowly in a cast-iron skillet over low heat (around 200-225°F) for 30-40 minutes.

Alternative Cuts: Chinese Style and Small Pieces
Cutting spare ribs Chinese style means slicing across the bones into 1-to-2-inch strips rather than between them. This technique requires a heavy meat cleaver or butcher’s bone saw. The resulting small rib pieces are ideal for wok-frying, braising, and sticky glazed rib recipes that cook in 30-45 minutes instead of hours on the smoker.
Creating Chinese-Style Ribs
To cut spare ribs into small pieces, place the trimmed rack on a sturdy cutting board. Position a heavy cleaver perpendicular to the bones and strike firmly to cut through each bone.
Getting Butcher Assistance
Many butchers will cut ribs Chinese style for free if you ask when purchasing. This saves effort and produces cleaner cuts than most home cooks achieve with a cleaver. Small-cut spare ribs work well in braised dishes, pressure cooker recipes, and stir-fry preparations. They absorb flavorful meat marinades and sauces quickly due to their increased surface area.
How Do You Cut Ribs After Cooking?
Cut cooked spare ribs by flipping the rack meat-side down on a cutting board so the bones are clearly visible. Use a long, sharp slicing knife to cut between each bone in one smooth stroke. Always rest ribs for 10-15 minutes after removing them from the smoker to let juices redistribute throughout the meat.
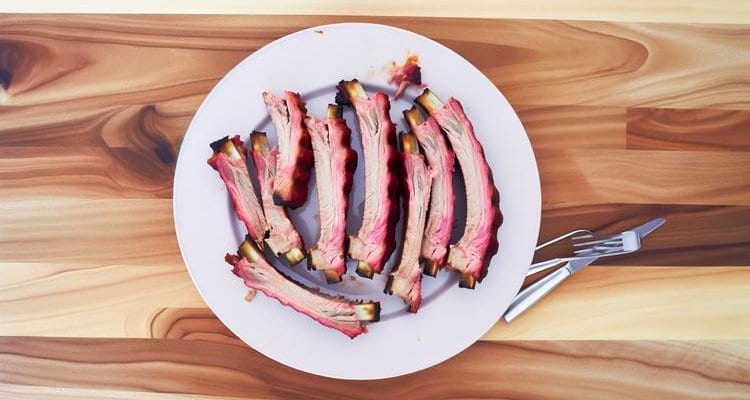
Resting the Ribs is Critical
Resting is critical. Cutting too early releases juices that would otherwise stay in the meat, leaving you with dry ribs and a messy board.
Slicing Technique for Clean Cuts
Flip the rack bone-side up so the bones are clearly visible. Slice between each bone using a long, sharp knife. Avoid serrated knives, which tear the bark and shred the meat surface. For presentation, cut the rack in half first, then separate individual ribs. This gives you more control and cleaner cuts than working through the full slab at once.
How Do You Store Trimmed and Untrimmed Ribs?
Store trimmed spare ribs in the refrigerator for up to two days by wrapping them tightly in plastic wrap. For long-term storage, wrap them in plastic and foil, place in a freezer bag, and freeze for up to six months at 0°F.
Refrigerating Trimmed Ribs
You can trim spare ribs up to two days before you plan to cook them. After trimming, apply your dry rub and wrap the rack tightly in plastic wrap or place it in a vacuum-sealed bag. Store it in the coldest part of your refrigerator, ideally below 40°F.
Freezing Trimmed Ribs
For longer storage, trimmed ribs freeze exceptionally well. Wrap them tightly in plastic wrap, followed by a layer of aluminum foil or butcher paper, and place them in a freezer bag. They will keep for up to 6 months in a freezer set to 0°F.
Frequently Asked Questions
Where should you trim spare ribs?
How long does it take to trim spare ribs?
What should you do with spare rib trimmings?
Which side of spare ribs has the membrane?
What are common mistakes when cooking ribs?
Should you trim ribs before or after cooking?
Can you trim baby back ribs the same way?
What temperature should spare ribs reach when done?
Do you need a special knife to trim spare ribs?
Can you freeze spare rib trimmings?
What is a shiner on a rack of ribs?
A shiner refers to a rack of ribs where the butcher sliced too close to the bone, leaving the white bone exposed through the meat. It is best to avoid buying shiners because the exposed bone heats up quickly during cooking, which dries out the surrounding meat and causes it to pull away prematurely.
Do you have to remove the membrane from spare ribs?
You do not strictly have to remove the membrane, but doing so is highly recommended. The membrane acts as a tough barrier that blocks dry rubs and smoke from penetrating the meat, and it can become chewy and papery when cooked. If you choose to leave it on, scoring it with a sharp knife will help seasonings get through.
Take Home Message
Trimming spare ribs is a simple yet impactful step that elevates your BBQ from good to great. By creating a uniform St. Louis cut, you ensure every bite is tender, juicy, and perfectly cooked. Don’t skip this crucial prep step for competition-worthy results.
Related BBQ Guides

BBQ Tool Sets: Professional-Grade Essentials for 2026
Looking for the perfect BBQ grill tool set? Our expert guide reviews the top 10 sets for 2026, from professional-grade to budget-friendly options. Find your ideal

Grill Like a Pro: Top BBQ Tool Sets for Serious Grillers
Discover the best BBQ tool sets for serious grillers. Our guide reviews durable stainless steel kits with features like long handles and carry cases.

Grill Wind Guards: Your Guide to Consistent Flame Control
Discover our top-rated grill wind guards for 2026. We tested the best for durability, heat resistance, and easy setup. Find the perfect fit for your BBQ.