
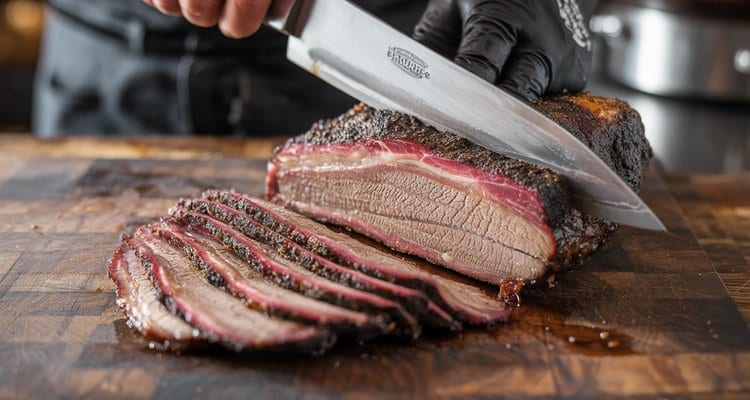
You’ve just pulled a 14-pound brisket off the smoker after 14 hours. It smells incredible. But knowing how to slice brisket correctly is what separates a juicy, tender plate from a dry, stringy disappointment. Get this step wrong and all that time goes to waste. Here’s everything you need to do it right – from resting to the final cut.
Understanding Brisket Anatomy: The Flat and the Point
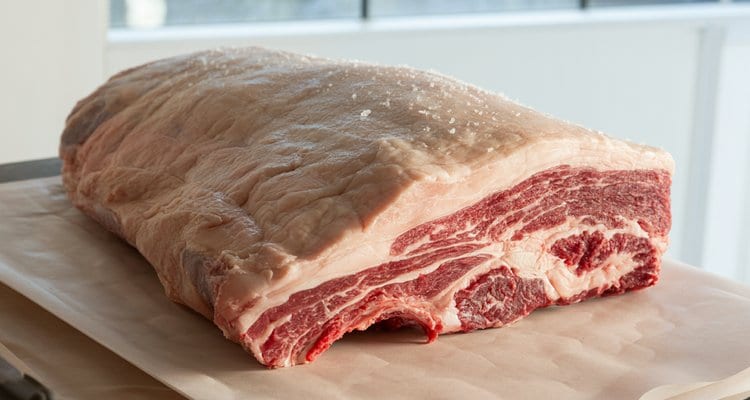
A whole packer contains two overlapping muscles with different grain directions:
- Flat, or first cut: The leaner and more uniform section, generally 1–2 inches thick. It produces the classic slices most people associate with brisket.
- Point, second cut, or deckle: The thicker, fattier, heavily marbled section that overlaps the flat. Its grain turns away from the flat’s grain, and it is also the preferred cut for brisket burnt ends.
- Fat seam: A thin layer between the two muscles that marks the separation line.
Separate the flat and point before slicing so each muscle can be turned and cut perpendicular to its own grain.
The Right Knife for Slicing Brisket
Choose a long, sharp blade that can cross the brisket in one smooth stroke. Short or dull knives require repeated passes that tear the meat and crush the bark.
| Knife Type | Best For | Pros | Cons |
|---|---|---|---|
| Granton-Edge Slicer (12-14″) | Standard slicing | Clean cuts, minimal drag, long reach | Requires regular sharpening |
| Long Serrated Slicer (12″) | Thick bark | Saws through bark without crushing | Harder to maintain; tears some meat |
| Chef’s Knife (8-10″) | Not recommended | Most people already own one | Too short; requires multiple strokes |
| Boning Knife (6″) | Separation only | Great for separating flat from point | Way too short for slicing |
A 12–14-inch Granton-edge slicer is the best general choice; use a long serrated slicer for unusually hard bark and reserve a boning knife for following the fat seam.
Pair the knife with a cutting board at least 18 by 24 inches. Butcher block or thick plastic both provide enough room to separate, rotate, and slice a whole packer safely.
Rest Your Brisket Before You Slice (This Step Is Non-Negotiable)
Resting lets contracted muscle fibers relax and reabsorb moisture that would otherwise spill onto the cutting board. Use these checkpoints:
- Minimum rest: Wait at least 1 hour before slicing.
- Best-results rest: Hold the wrapped brisket for 2–3 hours in a cooler without ice. This “faux cambro” setup maintains a safe serving temperature for hours.
- Ready-to-slice range: Look for an internal temperature around 150–160°F and meat that feels firm but slightly pliable through the wrapping.
Keep the brisket wrapped throughout the hold so its moisture remains with the meat instead of evaporating.
How to Slice a Brisket Step by Step
Slicing brisket correctly means cutting against the grain – perpendicular to the muscle fibers – in uniform 1/4-inch slices. Separate the flat from the point first, since each muscle’s grain runs in a different direction. Here’s how to do it.
Why You Must Slice Against the Grain
Muscle fibers run in long parallel strands. When those strands stay intact in your slice, every bite requires you to tear through them – that’s the stringy, chewy texture people associate with bad brisket. When you cut across those fibers, you shorten them dramatically. Each slice becomes a cross-section of hundreds of short fiber segments instead of a bundle of long ones. The result is tenderness, even in meat that isn’t perfectly cooked.
Slicing with the grain is the single most common brisket mistake. A beautifully smoked brisket can be ruined in 30 seconds by slicing in the wrong direction.
Step 1 – Identify the Grain Direction
Before you start cutting, look at the surface of the flat. You’ll see parallel lines running in one direction – those are the muscle fibers. Your knife needs to go perpendicular to those lines.

If you’re looking at a cooked brisket with heavy bark, look at the cut end or any exposed edge where you can see the fiber direction clearly.
Step 2 – Separate the Flat from the Point
Place your non-dominant hand on top of the brisket and press gently, moving your hand in a small circular motion. You’ll feel where the meat is firmer (flat) and where it’s softer and bulges up (point). The fat seam between them gives slightly under pressure.
Once you find that seam, use your slicing knife (or a boning knife) to cut through the fat layer with one or two long slicing strokes. Set the point aside – you’ll come back to it. Now you have the flat in front of you with room to work.
Step 3 – Slice the Flat Against the Grain
Orient the flat so the grain runs left-to-right (parallel to you), and your knife will move front-to-back (perpendicular to the grain). Start at the thicker end and work toward the thinner end.
Target 1/4-inch slices – roughly the thickness of a pencil. Use long, smooth strokes. Let the sharpness of the knife do the work. Don’t press down or saw aggressively; the meat is tender and pressure will crush it. Each stroke should feel controlled and fluid.
Keep your slices as uniform as possible – this isn’t just for appearance. Uniformity means everyone gets the same experience, and it makes reheating more consistent if you’re serving later.
Step 4 – Rotate the Point and Slice
Now pick up the point. Look at the grain direction – it runs at roughly a 90-degree angle from the flat. If you try to slice it the same way you sliced the flat, you’ll be cutting with the grain, not against it.
The Aaron Franklin method: Cut the point in half widthwise. Take one half, rotate it 90 degrees, and slice against the grain. Repeat with the other half. This ensures you’re always cutting across the fibers regardless of where in the point you are.
Slice the point to the same 1/4-inch thickness as the flat for serving, or cut it into 1-inch cubes if you’re making burnt ends.

Common Brisket Slicing Mistakes to Avoid
- Slicing with the grain. The most common error. Long, stringy slices mean you went the wrong direction. Re-orient your knife 90 degrees.
- Not resting the brisket first. Slicing hot off the smoker sends juice onto the cutting board instead of staying in the meat.
- Slicing the entire brisket at once. Cut surfaces dry out fast. Only slice what you plan to serve within the next 20 minutes. Keep the rest wrapped.
- Using a short or dull knife. Multiple strokes per slice tears the meat. A dull knife crushes instead of cuts. Use a long, sharp blade.
- Pressing down instead of sawing. Let the blade glide. Downward pressure collapses the meat structure, especially in the tender point.
- Not separating flat from point. These two muscles have different grain directions. Slicing through both together means at least half your slices are cut with the grain.
How to Slice Brisket for Different Uses
The right slice thickness and cut style depends on how you’re serving the brisket.
| Use | Thickness | Best Cut | Notes |
|---|---|---|---|
| Plated serving | 1/4 inch | Flat | Standard Texas BBQ style |
| Sandwiches | 3/8 inch | Flat or point | Slightly thicker holds up to toppings |
| Tacos / nachos | Chopped | Point | Rough chop against the grain |
| Burnt ends | 1-inch cubes | Point only | Cut into cubes, return to smoker |
| Meal prep / reheating | 1/4 inch | Flat | Slice just before serving, not ahead |
For plated servings and meal prep, default to 1/4-inch flat slices; choose thicker slices or point meat when toppings and richer applications need more structure.
Storing and Reheating Sliced Brisket
The central rule is to slice only what you plan to serve. Exposed cut surfaces lose moisture much faster than a wrapped whole piece.
- Refrigerate for up to 4 days: Store leftover brisket whole, wrapped first in butcher paper and then foil.
- Freeze for 2–3 months: Keep the brisket tightly wrapped to reduce moisture loss.
- Reheat slices at 250°F: Put them in an oven-safe dish, add a splash of beef broth, cover tightly with foil, and heat for 20–25 minutes. The trapped steam keeps the meat moist.
- Reheat whole pieces the same way: Use broth and foil but allow additional time for the thicker piece to warm through.
- Avoid the microwave when possible: It heats unevenly and dries the edges first. If necessary, cover the meat with a damp paper towel to retain some steam.
For a shorter cook before slicing, see the hot and fast brisket method.
A Few More Slicing Details
Fat Side Up or Down on the Board
Set the brisket fat side down on your cutting board before you slice. The fat cap gives you a flatter, more stable base to cut against, so the meat doesn’t wobble or roll under the knife the way it can if the rounded, leaner side is down.
Wear Insulated Gloves for the Job
A pair of clean, heat-resistant BBQ gloves makes slicing safer and easier, especially with a brisket that’s still warm. They let you steady the meat with one hand while you cut with the other, without worrying about grease or heat on bare skin.
Slicing Cold Leftovers Before Reheating
When you’re ready to serve refrigerated leftover brisket, slice it cold, straight from the fridge, before reheating. Cold brisket holds together far better under the knife than a piece that’s already been warmed, so you get cleaner slices; then reheat just the portions you need using the broth-and-foil method described above.
Labeling Lean and Fatty Slices for Guests
When serving a crowd, it’s standard Texas-BBQ practice to keep the flat and point slices separate on the platter and label them — “lean” for the flat, “fatty” or “moist” for the point. It lets guests choose what they prefer without asking, and it’s an easy way to show off both cuts from the same brisket.
Frequently Asked Questions
Which direction do you slice brisket?
Always slice brisket against the grain – perpendicular to the muscle fibers. The fibers look like parallel lines on the surface of the meat. Your knife should move at a 90-degree angle to those lines. Cutting with the grain leaves long intact fibers that make the meat chewy and stringy.
How do I know which way the grain runs on a brisket?
Look at the surface of the flat – you’ll see lines running in one direction. Those are the muscle fibers. If the bark is very dark and hard to read, check any exposed edge. The easiest method: before cooking, cut a small notch in one corner of the flat so you have a clear reference once the brisket is cooked and bark-covered.
How thick should brisket slices be?
The standard is 1/4 inch – roughly the width of a pencil. This thickness gives you a slice that’s tender but still holds together on a plate or in a sandwich. Going thinner risks the slice falling apart. Going thicker can make even well-cooked brisket feel tough. For sandwiches, 3/8 inch holds up better to fillings.
Should I separate the flat and point before or after cooking?
After cooking. Keeping the brisket intact during the cook helps protect the flat from drying out – the fat cap on the point acts as a natural moisture barrier. Separate them just before slicing, using the fat seam as your guide.
Can you slice brisket ahead of time?
It’s best to slice immediately before serving. Sliced brisket dries out quickly once the cut surface is exposed to air. If you must slice ahead, cover the slices tightly with plastic wrap or vacuum seal them. Reheat gently with a small amount of beef broth at 250°F to restore moisture.
What is the best knife for slicing brisket?
A 12 to 14 inch Granton-edge slicing knife is the top choice – the oval dimples reduce drag and sticking. A long serrated knife is a solid alternative, especially for cutting through very hard bark. Avoid short knives; they require multiple strokes per slice, which tears the meat and ruins the texture.
Why is my sliced brisket dry?
The most common causes: slicing before the brisket has fully rested (juices run onto the board), slicing with the grain instead of against it (fibers don’t release moisture properly), slicing the whole brisket at once and letting it sit exposed, or overcooking past 210°F. Fix the first two and dryness almost always disappears.
What do I do with the brisket point after slicing the flat?
You have two great options. Slice it against its own grain direction (rotate 90 degrees from how you sliced the flat) for rich, fatty slices. Or cube it into 1-inch pieces and make burnt ends – return them to the smoker with sauce for another 1 to 2 hours for the best bite in BBQ.
How long should brisket rest before slicing?
A minimum of 1 hour. For best results, rest 2 to 3 hours wrapped in butcher paper inside a cooler. This faux cambro method keeps the brisket hot enough to serve safely for up to 4 hours. The longer rest allows more complete moisture redistribution and results in noticeably juicier slices.
Can you slice brisket with an electric knife?
Yes, and many pitmasters use them for large quantities. An electric knife produces fast, uniform slices without tiring your arm. The trade-off: the vibrating blade can make the very tender point crumble if you’re not gentle. Keep a light touch and let the blades do the work. It won’t damage the bark as much as you might expect.
Do you slice brisket hot or cold?
Slice it warm, after the rest period. Cold brisket (straight from the refrigerator) is firmer and actually easier to slice thinly, but the fat has solidified and the texture suffers. Warm brisket slices beautifully, tastes better, and holds its moisture in the slice rather than the fat congealing on your plate. If reheating, warm it gently before slicing.
What is the Aaron Franklin method for slicing brisket?
Franklin separates the flat from the point, then slices the flat on a slight diagonal across the grain. For the point, he cuts it in half widthwise, then rotates each half so he can slice across that section’s grain direction. This ensures every slice from both muscles is cut against the grain, regardless of the grain angle changes across the brisket.
The Final Cut
Slicing brisket well comes down to three things: rest it long enough, separate the flat from the point, and always cut against the grain. Do those three things consistently and you’ll pull perfect slices every time – tender, moist, and worth every hour you put into the cook.
The first time you try this method it takes a few minutes of concentration. By the third brisket, it’s second nature. And when you see those clean, pink-ringed slices fanning out on the board, you’ll know every bit of the effort was worth it.
Related BBQ Guides

Fish Smokers: Perfect Options for Delicate Seafood Smoking
Find the perfect fish smoker for your needs with our comprehensive guide. Compare electric, propane & charcoal smokers from top brands, with expert tips for
Master Two-Zone Grilling: The Complete Setup Guide
Master two zone grilling with our complete guide. Set up direct and indirect heat zones on any grill for searing, slow cooking, and flawless results.
Tender Smothered Pork Steaks with Rich Onion Gravy
Learn this smothered pork steak recipe with pork shoulder steaks, onion gravy, searing tips, braising time, storage advice, and smoky BBQ options.