

Your cast iron skillet can last generations, but only if you season it correctly. Seasoning creates a natural, nonstick surface that protects the metal from rust and improves with every cook. This guide covers the complete process for how to season cast iron, whether you’re working with a brand-new pan, a rusty antique, or large cast iron griddles.
What Exactly Is Cast Iron Seasoning?
Cast iron seasoning is a layer of polymerized oil bonded to the metal surface through high heat. When fat or oil heats past its smoke point, it breaks down and chemically bonds to the iron, creating a slick, durable coating that prevents rust and provides naturally nonstick cookware performance.
The term “seasoning” has nothing to do with salt, pepper, or spices. It refers to the thin, hardened layer of polymerized fat that coats the pan’s surface. This layer builds up over time with regular use. Polymerization happens when oil molecules break apart under intense heat and re-bond to the iron in a cross-linked pattern. The result is a smooth, glass-like patina that repels moisture and releases food cleanly. A properly seasoned cast iron skillet resists corrosion even in humid environments. Each time you cook with oil or fat, you add another microscopic layer of seasoning to the surface.
- ThermoMaven bristle-free grill brush — clean grates thoroughly without loose bristles
- TrendPlain glass oil sprayer — get a thin, even oil coat for consistent grilling
- Hotec stainless kitchen tongs — turn food without piercing to keep juices
- Lodge cast iron skillet — create a non-stick surface for BBQ sides
What Are the Best Oils for Seasoning Cast Iron?
Grapeseed oil, canola oil, vegetable oil, and vegetable shortening like Crisco are the top choices for seasoning cast iron. These oils have high smoke points between 400-475°F that allow full polymerization at oven temperatures, creating a durable and even seasoning layer.
The smoke point of your chosen oil matters because seasoning requires heating oil past that threshold. Oils with higher smoke points polymerize more evenly at standard oven seasoning temperatures of 450°F.
| Oil Type | Smoke Point | Seasoning Rating | Notes |
|---|---|---|---|
| Grapeseed Oil | 420°F | Excellent | Neutral flavor, even polymerization |
| Canola Oil | 400°F | Excellent | Widely available, affordable |
| Vegetable Shortening (Crisco) | 360°F | Excellent | Traditional choice, easy to apply evenly |
| Vegetable Oil | 400-450°F | Good | Affordable kitchen staple |
| Flaxseed Oil | 225°F | Poor | Prone to flaking despite online popularity |
| Olive Oil (Extra Virgin) | 325-375°F | Fair | Too low for oven seasoning; fine for cooking |
| Bacon Grease / Lard | 370-400°F | Good | Great for cooking; can go rancid if stored long |
Avoid flaxseed oil despite its online popularity. It polymerizes quickly but creates a brittle layer that chips and flakes within weeks of regular use. Animal fats like bacon grease and lard work well for everyday cooking but can go rancid if the pan sits unused for long periods. Stick to plant-based oils for initial oven seasoning.
How Do You Season Cast Iron in the Oven?
The proper way to season cast iron is to wash the pan, dry it completely, apply a very thin layer of high-smoke-point oil, and bake it upside down at 450°F for 1 hour. This oven method provides the most even and durable seasoning coat across the entire surface of the cookware.
Step 1: Wash and Scrub
Wash the skillet thoroughly with warm, soapy water. Modern dish soap like Dawn is safe for cast iron when used briefly, and USDA food-safety guidance emphasizes clean food-contact surfaces before cooking[USDA]. Use a stiff brush or scrub pad to remove any factory coating, old food residue, or surface rust. This is the only time you should use soap aggressively on cast iron cookware.
Step 2: Dry Completely
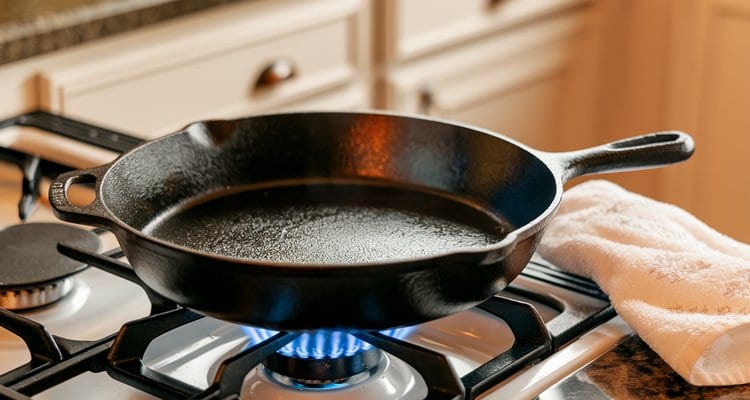
Dry the skillet immediately with a clean towel. Cast iron is highly susceptible to flash rust, especially when wet. Place the pan on the stove over low heat for 2-3 minutes to evaporate every trace of moisture. You should see no water spots or dampness before moving to the next step.
Step 3: Apply a Thin Layer of Oil
Pour a small amount of your chosen oil onto a paper towel or lint-free cloth. Rub it across every surface of the pan: inside, outside, and handle. Now buff the oil out with a clean paper towel until the pan looks almost dry. This is the single most important technique. Leaving too much oil causes sticky, splotchy seasoning.
Step 4: Bake Upside Down at 450°F
Place the oiled skillet upside down on the center rack of your oven. Set a sheet of aluminum foil on the rack below to catch any oil drips. Bake at 450°F for 1 hour. This temperature exceeds the smoke point of most recommended oils, ensuring full polymerization. Seasoning at 350°F is too low and typically leaves a sticky residue.
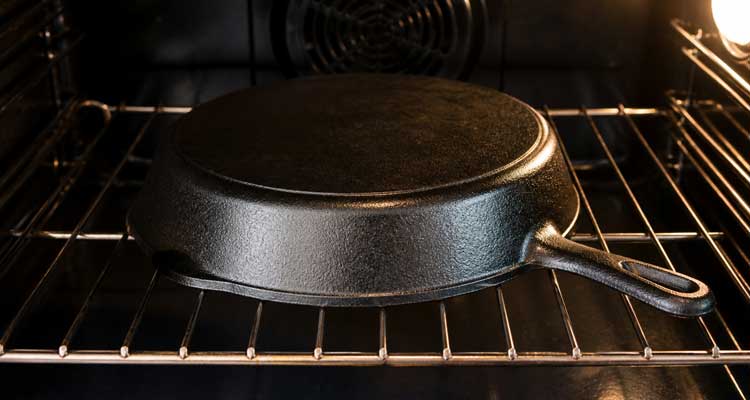
Turn the oven off after 1 hour and let the pan cool completely inside. Do not remove it while hot. Repeat the oil-and-bake cycle 2-3 times for a strong initial seasoning base.

How Do You Season Cast Iron Without an Oven?
You can season cast iron on the stovetop by heating the pan over medium-high heat and wiping on a very thin layer of oil with tongs and a folded paper towel. Let the oil smoke for 2-3 minutes, then repeat 3-4 times for a quick seasoning layer without turning on the oven.
Stovetop Seasoning Method
Use the stovetop method when the pan needs a quick seasoning touch-up and you do not want to run a full oven cycle:
- Heat the clean, dry skillet. Set it over medium-high heat until it just begins to smoke.
- Apply a thin coat of oil. Use tongs to hold a folded paper towel dipped in oil, then wipe it across the cooking surface.
- Let the oil polymerize. Keep heating the pan for 2–3 minutes, until the smoking stops.
- Build additional layers. Repeat the oiling and heating process 3–4 times.
This method works well for quick touch-ups, but it does not season the outside of the pan as effectively as the oven method.
Seasoning a Cast Iron Griddle or BBQ Cookware
Large cast iron griddles and BBQ cookware often will not fit inside a standard kitchen oven. Use an outdoor gas grill to create the same high-heat environment:
- Preheat the grill. Set all burners to high and bring the grill to 450–500°F.
- Oil the cookware. Apply the same thin layer you would use for oven seasoning.
- Bake with the lid closed. Place the griddle on the grill grates, close the lid, and heat it for 45–60 minutes.
- Repeat the cycle. Apply and bake 2–3 coats to establish a solid base layer.
The grill method seasons oversized cast iron evenly without requiring it to fit inside the kitchen oven.
How Do You Maintain and Troubleshoot Cast Iron?
A well-seasoned cast iron pan rarely needs a full oven re-seasoning. Regular cooking with oil or fat naturally maintains and builds the nonstick layer over time. Clean with hot water and a stiff brush after each use, then apply a light oil wipe to keep the seasoning intact.
Don’t be alarmed if a black residue rubs off onto your towel while drying or oiling the pan — that’s just excess carbon from the seasoning layer, not a sign of damage or something coming off that shouldn’t. A small amount is normal and harmless; it usually settles down as the seasoning matures with more use.
How Often to Season Cast Iron
A full oven seasoning is only needed when the pan is new, stripped, or significantly damaged. Most cast iron owners only do a full seasoning 1-2 times in the pan’s lifetime. Regular cooking with fats naturally maintains the seasoning. A quick stovetop touch-up after washing is enough if the pan looks dull or food starts to stick slightly.
Common Mistakes When Seasoning Cast Iron
- Too much oil: The number-one cause of sticky, gummy, or splotchy seasoning. Buff off all visible oil before baking.
- Temperature too low: Baking at 350°F fails to fully polymerize the oil. Use 450°F or slightly above your oil’s smoke point.
- Soaking in water: Extended water contact causes rust. Wash quickly, dry immediately, and heat on the stove to remove all moisture.
- Using flaxseed oil: Despite online recommendations, flaxseed oil creates a hard but brittle seasoning that chips and flakes with regular use.
What Are the Health Benefits of Cooking with Cast Iron?
Cooking in cast iron cookware can increase the iron content of food by 1.5 to 3 times, according to published research. This dietary iron boost is especially noticeable when cooking acidic foods like tomato sauce, which promotes iron transfer from the pan into the food.
That same acidity is a double-edged sword for the seasoning itself, though: simmering something acidic like tomato sauce or a wine reduction for a long stretch — especially in a newer or thinly-seasoned pan — can gradually break down the seasoning layer. It’s not an instant problem for a quick sear, but long, slow acidic braises are worth doing in a well-established, thickly-seasoned pan rather than a brand-new one.
Can Cast Iron Help with Iron Deficiency?
Iron is an essential mineral the body uses to make hemoglobin, a protein in red blood cells that carries oxygen throughout the body[NIH]. Cooking in cast iron cookware can leach small, safe amounts of dietary iron into your food. This effect is strongest with acidic foods like tomato sauce, citrus-based sauces, and vinegar-based BBQ sauces. Longer cook times and higher moisture content also increase iron transfer from the pan. For individuals with iron deficiency or anemia, regularly cooking in a well-seasoned cast iron skillet can provide a meaningful dietary supplement[NIH]. However, cast iron cooking should complement medical treatment, not replace it.
Frequently Asked Questions
Why is my cast iron skillet sticky after seasoning?
Can I use steel wool on cast iron?
Do I have to season a pre-seasoned pan?
Should I season cast iron at 350 or 450?
Is Dawn dish soap safe for cast iron?
What oil is best to season cast iron?
How do I remove rust from cast iron?
Can I season cast iron with olive oil?
How long does cast iron seasoning last?
Can I put cast iron in the dishwasher?
Related BBQ Guides
Juicy Smoked Brats with Beer Onions and Perfect Snap
Master smoked brats with steady smoker temps, juicy casings, wood choices, and beer onions for a crowd-ready cookout recipe with perfect snap.

Kamado vs Pellet Smokers: Choosing Your Perfect BBQ Partner
Discover the Pros and Cons of Kamado vs Pellet Smoker. Get the Best BBQ Tips and Tricks at BBQ Report. Find Your Perfect Grill Today!

BBQ Tongs: Essential Tools for Precise Grilling Control
Looking for reliable BBQ tongs? We tested top grill tongs including heavy-duty & extra-long options to find the most durable grilling tools for your needs.