
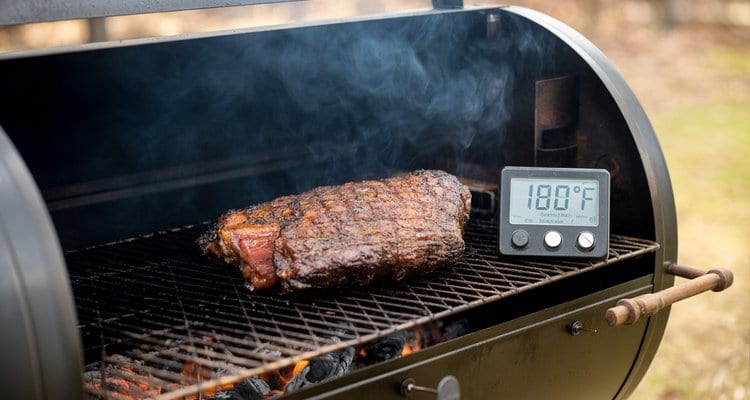
You’re hours into a brisket cook and everything is going perfectly. The smoke is rolling, the bark is forming, and then it happens — the temperature stops climbing.
Your thermometer has hovered at the same reading for two solid hours, and mild curiosity is turning into panic. If you’ve been there, you’ve experienced the brisket stall, one of the most misunderstood moments in low-and-slow barbecue (a reliable instant-read thermometer takes the guesswork out of knowing exactly when you’ve hit your target).
The good news is that the stall is completely normal. Understanding what causes it — and how to handle it — separates a calm pitmaster from one who makes a costly, bark-ruining mistake.
This guide breaks down the science behind the brisket stall, the typical temperature range, how long it lasts, and the proven methods for pushing through it on your terms.
What Exactly Is the Brisket Stall?
The brisket stall is a prolonged plateau during the cooking process where the internal temperature of the meat stops rising — sometimes for hours — before it finally begins climbing again. Most backyard cooks assume it’s caused by the rendering of fat or the breakdown of collagen. Both are common myths.
The real cause is evaporative cooling. Here’s what’s actually happening inside your smoker during a cook:
- As the meat heats up, moisture migrates from deep inside the brisket to its surface.
- That surface moisture evaporates into the smoker environment.
- Evaporation is a cooling process — it pulls heat away from the meat’s surface just as fast as the pit temperature pushes it in.
- The internal temperature stops rising until enough moisture has evaporated for the heat to take over again.
Think of it like sweating: your body uses evaporation to cool itself during exercise, and a brisket in a smoker does the same thing. The pit keeps pumping heat in, but evaporation keeps pulling it back out until those forces reach equilibrium. That equilibrium is the stall.

- ThermoMaven wireless meat thermometer — track stall behavior without opening the smoker
- Bryco Goods pink butcher paper — keeps meat moist during long smokes
At What Temperature Does Brisket Stall?
The brisket stall most commonly occurs between 150-170°F internal temperature. This is the range where moisture migration and evaporation are most active, and where the cooling effect is strong enough to perfectly counteract a typical pit temperature.
That said, the stall doesn’t always behave by the book. Here’s how to interpret what your thermometer is telling you:
Early Stall Around 145°F
A plateau at 145°F is less common but does happen. The usual causes are:
- Pit temperature running too low — If your smoker is cooking below 225°F, the evaporative cooling effect wins the equilibrium battle more easily and the stall sets in earlier.
- Exceptionally large or wet brisket — More mass and more surface moisture means greater cooling power. A big, wet packer can stall earlier than a smaller, drier cut.
- Thermometer probe placement — A probe sitting in a fat pocket or positioned too close to the surface will give a falsely low reading. Calibrate your thermometer and reposition the probe to the thickest part of the flat, away from the fat cap.
Late Stall Around 180°F
A plateau — or what feels like a second stall — at 180°F is almost always caused by external factors re-wetting the meat’s surface after the first stall has broken:
- Frequent lid opening — Every time you open the smoker, you introduce cooler air that disrupts the cooking environment and can restart the evaporation cycle.
- Heavy spritzing or mopping — Spraying liquid onto the brisket deposits fresh surface moisture and can trigger a second round of evaporative cooling.
- Fire temperature drop — If your fuel runs low or airflow tightens and the pit temperature dips significantly, the balance can shift back toward stalling even at higher internal temperatures.
| Stall Temperature | What It Means | What to Check |
|---|---|---|
| ~145°F (Early) | Pit temperature may be running too low, or brisket is very large or wet | Verify smoker temperature; recheck probe placement in thickest part of the flat |
| 150-170°F (Normal) | Classic stall — evaporative cooling is at peak equilibrium with pit heat | Stay patient; decide on your wrapping strategy based on bark development |
| ~180°F (Late/Second) | Moisture re-introduced via spritz, lid opening, or fire temperature drop | Limit lid openings; reduce or eliminate spritzing; check fuel level |
How Long Does a Brisket Stall Last?
The honest answer for most cooks: anywhere from 2 to 6 hours. That wide window is exactly what trips up beginners who expect a predictable clock. Several variables determine how long your stall will run:
- Size and thickness — A larger, thicker brisket holds more moisture and typically stalls longer than a smaller cut. A 14-pound packer will often stall longer than an 8-pound flat.
- Humidity inside the smoker — A wetter cooking environment slows evaporation, which can actually prolong the stall. Setups with water pans may see longer stalls than drier-running offset smokers.
- Airflow — More airflow across the brisket surface accelerates evaporation and can shorten the stall. Tighter, more closed-off smokers trap humid air around the meat and extend it.
- Cooking temperature — A higher pit temperature means more heat is available to eventually overpower evaporative cooling. Cooking at 250°F or 275°F generally produces a shorter stall than cooking at 225°F.
- Brisket grade — A Prime brisket carries more intramuscular fat and may behave slightly differently through the stall compared to a leaner Select grade cut, though the difference in stall duration is typically minor.
Smoker design changes airflow and humidity, so the same set temperature can produce a different stall:
| Smoker type | Expected stall behavior |
|---|---|
| Pellet smoker | Usually predictable and often 2–4 hours for a full packer because automated heat and steady airflow keep conditions consistent. |
| Offset smoker | May run shorter or longer from cook to cook because natural airflow and hands-on fire management create more variation. |
| Kamado cooker | Often longer than on a pellet smoker or drafty offset at the same temperature because heavy insulation retains humidity and slows surface evaporation. |
If you switch smokers, build extra time into the first cook. A brisket that finishes in 12 hours on a pellet smoker can take 14–15 hours on a kamado at the same temperature when you skip the wrap.
Is the Stall Good for Brisket?
Counterintuitively, yes — the stall is one of the most important stages of the entire cook. The extended time your brisket spends at a lower temperature while the stall runs is what allows a truly great bark to develop.
During the stall, the surface of the meat is slowly drying out. The rub interacts with rendered surface fat and drying proteins to form that coveted dark, flavorful crust. Without this extended drying period at a lower temperature, you end up with a softer, less defined exterior that lacks the texture and depth that defines competition-caliber BBQ brisket.
The warning: Rushing through the stall too aggressively — particularly by wrapping brisket before the bark has set — can ruin what you’ve built. If you wrap too early, the trapped steam will wash away the bark before it has hardened, leaving you with a soft, mushy exterior that no amount of additional cooking will fix.
What to Do When Your Brisket Stalls
You have four proven options when your brisket hits the stall. Each has tradeoffs, and the right choice depends on your timeline, your equipment, and how much you value a hard, crunchy bark.

Method 1: The Texas Crutch (Aluminum Foil)
The Texas Crutch means pulling the brisket from the smoker and wrapping it tightly in two layers of heavy-duty aluminum foil before returning it to the heat. The sealed foil creates an environment that completely stops evaporation — and without evaporation, the stall cannot continue.
Pros: The fastest way through the stall by a wide margin. The foil retains all released juices and steam, producing an extremely tender, moist brisket with minimal risk of drying out.
Cons: The sealed foil traps steam directly against the brisket’s surface. That steam will soften your bark — sometimes completely. If a firm, crunchy crust is a priority for you, the Texas Crutch will likely disappoint.
Technique: Pull the brisket when the internal temperature has stalled for at least 45-60 minutes and the bark looks dark and set. Lay out two overlapping sheets of heavy-duty foil, place the brisket fat-side up in the center, and fold the sides tightly with double-fold seams to create a leak-proof packet.
A loose wrap will let steam escape and reduce the speed benefit. Return the wrapped brisket to the smoker at the same pit temperature and cook until the internal temperature reaches 200-205°F, then probe for tenderness before pulling.
Method 2: Wrapping in Butcher Paper
Pink butcher paper is the method made famous by legendary pitmaster Aaron Franklin. Unlike foil, butcher paper is porous — it breathes. This means some evaporation continues through the wrap, which preserves significantly more of the bark’s texture while still creating a heat boundary that accelerates the cook through the stall.
Pros: The best balance between speed and bark integrity available. The brisket picks up a small amount of the paper’s moisture and held juices without the steaming effect of foil. Most top-tier competition briskets are finished this way.
Cons: Slightly slower than foil, and it requires practice to wrap correctly without tearing the paper and breaking the seal. Always use unwaxed pink butcher paper — never waxed or bleached paper, which can release chemicals under heat.
Method 3: Raising the Pit Temperature
A third option is to keep the brisket unwrapped and overpower the evaporative cooling by bumping your smoker temperature. If you’ve been cooking at 225°F, raising the pit temperature to 250°F or 275°F increases the heat input enough to eventually break the stall’s equilibrium without requiring any wrap at all.
Pros: Produces the best bark of any method since the brisket stays exposed to smoke the entire cooking time. No foil, no paper — just heat, smoke, and time.
Cons: Requires careful fire management. Higher temperatures risk drying out the flat or scorching the thinner edges if you’re not monitoring closely. This approach is easier to execute on a pellet smoker or kamado that holds temperature precisely than on an offset that takes more work to dial in.
A hot-and-fast cook pushes the same principle further. Before choosing it, weigh the operating temperature, time savings, and narrower safety margin:
- Pit temperature: Run the smoker at 300°F or higher for the entire cook.
- Effect on the stall: The higher heat input can compress the plateau to well under an hour or prevent a full stall from forming.
- Tradeoff: A cook may finish in 5–7 hours instead of 12 or more, but the flat can dry faster and there is less time for smoke exposure or recovery from temperature mistakes.
Hot-and-fast brisket rewards close monitoring; the standard 225–250°F approach gives you more room to correct the cook.
Method 4: Waiting It Out (No Wrap)
Sometimes the best move is no move at all. If time is on your side, letting the brisket ride through the stall completely unwrapped at your original cooking temperature rewards you with the most exceptional bark possible — dark, crunchy, and deeply flavored in a way that no wrap can fully replicate.
Pros: Maximum bark development. The brisket emerges from a long, patient cook with a crust that stands apart from anything wrapped.
Cons: This method demands significant patience — a stall that runs 5-6 hours requires careful monitoring throughout. Keep a close eye on the flat, which is the leaner section of the brisket and the most vulnerable to drying out if the cook extends long without a wrap protecting it.
Frequently Asked Questions

How Do You Fix a Brisket Stall?
The stall doesn’t need fixing — it’s a natural and beneficial part of the cooking process. If you need to speed things up, wrap in foil, wrap in butcher paper, or raise the pit temperature while keeping the brisket bare.
What you should not do is panic, crank the heat to extreme levels, or repeatedly open the smoker lid. Each lid opening introduces cooler air and can extend the stall further.
Will a Brisket Stall Twice?
A true double stall is uncommon, but a second plateau around 180°F-190°F can happen. Common causes include unwrapping the brisket mid-cook, heavy spritzing that re-wets the surface, or a significant fire temperature drop.
Maintaining consistent pit temperature and limiting unnecessary interventions is the most effective way to avoid a second stall.
What Is the 4-2-10 Rule for Brisket?
The 4-2-10 rule is a popular timing framework: 4 hours of heavy smoke exposure, 2 hours wrapped in foil to power through the stall, followed by 10 hours resting in a cooler or warming oven.
The extended rest is where much of the tenderizing happens, as residual heat continues working on the collagen after the brisket leaves the smoker.
Treat this as a rough guideline, not a rigid formula. Brisket cooking is best approached by internal temperature and probe tenderness rather than strict time targets.
When a probe inserted into the thickest part of the flat slides in with little resistance, your brisket is done regardless of the clock. Following time alone and ignoring tenderness is one of the most common ways a brisket ends up undercooked or overcooked.
What Is a Good Internal Temperature to Wrap Brisket?
Most pitmasters wrap brisket between 160-170°F, which is typically when the stall is well underway and the bark has had time to develop and set. Wrapping earlier than 160°F risks trapping moisture against bark that hasn’t fully hardened, which softens the crust.
Waiting until 170°F gives you more bark development but means you’ve already sat through the bulk of the stall before getting the speed benefit of the wrap.
What Does Probe Tenderness Feel Like When Brisket Is Done?
Probe tenderness is the single most reliable indicator that a brisket is finished. Insert an instant-read thermometer or skewer probe into the thickest part of the flat: if it meets noticeable resistance, the brisket needs more time.
When it slides in with little to no resistance, the sensation is often described as pushing into softened butter or a ripe avocado. That resistance-free entry tells you the collagen has fully converted to gelatin and the meat will slice cleanly without being tough.
Should You Rest Brisket After It Comes Out of the Stall?
Yes, and the rest period matters as much as the cook itself. Once the brisket hits probe tenderness, pull it from the smoker and rest it in a cooler or warming oven for at least 1 hour, and ideally 2-3 hours. During this rest, the internal temperature continues to rise slightly and the juices redistribute throughout the meat.
Slicing a brisket that hasn’t rested properly causes those juices to run out immediately, leaving the meat dry. For the best results, build a “faux Cambro”: preheat an empty cooler by filling it with hot tap water for 10 minutes, dump the water, dry it out, then place the wrapped brisket inside surrounded by a few towels to fill dead air space. Done this way, a well-insulated cooler can hold a brisket safely above 140°F for 4+ hours, giving you a wide buffer if your cook finishes earlier than planned.
Does Wrapping Brisket Affect Smoke Flavor?
Yes, to a degree. Once the brisket is wrapped, it stops absorbing new smoke. Smoke flavor develops primarily in the first few hours of the cook when the surface of the meat is moist and reactive.
By the time most briskets hit the stall at 150-170°F, the surface has dried out considerably and smoke absorption has already slowed.
Wrapping at that point locks in the smoke flavor already developed rather than cutting it short, so most cooks see little difference in smoke depth between wrapped and unwrapped briskets that spent the same time in the smoker before wrapping.
Can You Stall a Brisket in an Oven?
Yes. The brisket stall is caused by evaporative cooling, not by anything unique to a smoker, so a brisket cooking low and slow in an oven will stall in the same 150-170°F range for the same reason.
The oven environment is typically drier than most smokers, which can actually shorten the stall since evaporation completes faster with less ambient humidity.
The key difference is that an oven adds no smoke, so finishing a smoked brisket in the oven after a partial cook is a common technique that preserves smoke flavor while giving you more control over the final temperature. It’s also a practical fuel- and labor-saving move: once the brisket is wrapped and past the stall, transferring it to a 275°F home oven lets you stop tending a fire or refilling a hopper for the remaining hours, since no further smoke absorption is happening anyway at that point.
Mastering the Brisket Stall
The brisket stall is not a problem to be feared — it’s a process to understand and work with. Knowing that evaporative cooling is the true cause, that 150-170°F is the normal range, and that 2-6 hours of patience is often required will keep you calm when every other cook at the party is second-guessing their thermometers.
Choose your method based on your priorities: wrap in foil to race through it, use butcher paper to balance speed with bark, bump the pit temperature, or wait it out for the greatest crust possible.
All four approaches work. The best pitmaster understands the science well enough to make the right call for the specific cook they’re running and never panics when the temperature stops moving.
Related BBQ Guides

Smoked Goose: Complete Recipe for Domestic & Wild Birds
Master smoking goose with our complete guide. Compare domestic vs wild techniques, brining tips & pellet grill temps for mahogany-crisp skin.

Top Masterbuilt Smokers for Easy Backyard Barbecue
Discover the best Masterbuilt smoker for your backyard setup. Compare top electric and digital models to find the perfect fit for your next cookout.

The Ultimate Juicy Beef and Pork Burger Recipe
Master the ultimate beef pork burger recipe with our guide to the perfect 50/50 blend. Learn gentle mixing techniques for maximum juiciness and flavor.